My modded K&K Bass Master Rockabilly Plus has a 9 volt power adapter and no more belt clip!
K&K Bass Master Mods
I’ve written before about my love/hate relationship with my K&K Bass Master Rockabilly Plus. In short, the sound is phenomenal, but the execution is awful. After suffering with its flaws for the past 15 years, I finally decided I’d had enough and modded it.
I have a lot of pent up frustration about the dire state of double bass preamp design. If you prefer to skip the tirade and just get to the mod, I completely understand.
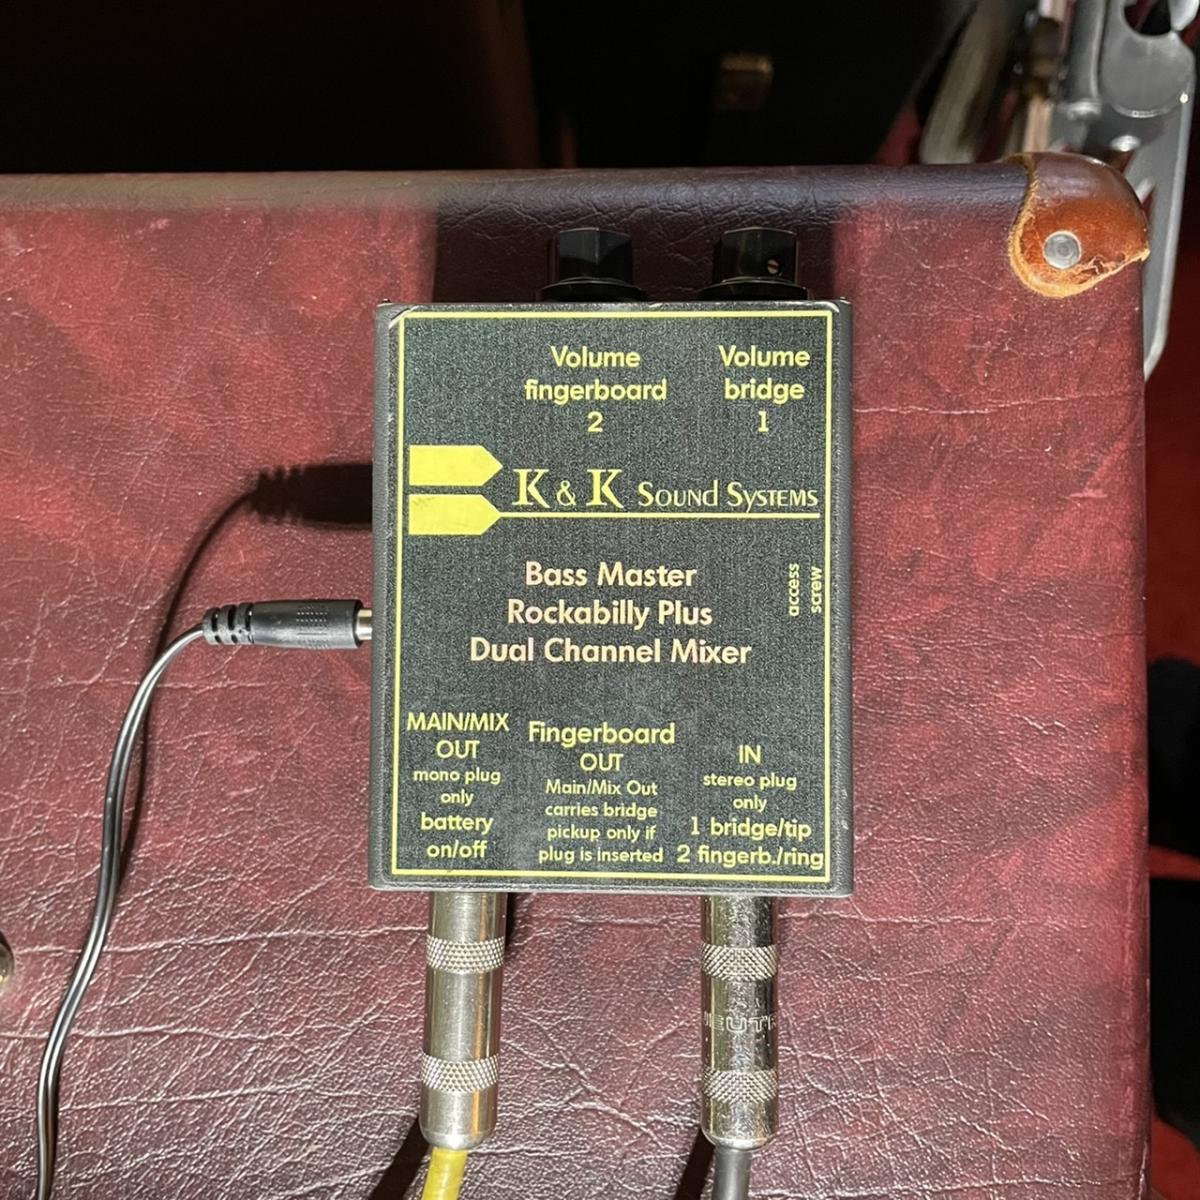
The basic concept of the K&K Sound Bass Master pickup system is brilliant: combine a two-pickup (or mic and pickup) system with a single TRS jack, and a two-channel mixer with a TRS input that allows you to blend the two pickups together (or send them to two separate amplifiers). The rockabilly version of this system with its fingerboard transducer is pretty much the gold standard for rockabilly players. Having a dedicated “clicky” pickup for the fingerboard is a game changer—so much so that its design has been copied by many other manufacturers.
Half of the magic of this system, though, is being able to send both pickup signals to the preamp with a single TRS (tip ring sleeve) cable. As I mentioned in the afore linked article, there are almost no mixers on the market with a TRS input jack that routes to two separate mixer channels. My beef with the K&K (and all of these rockabilly systems) is their insistence that you use some sort of ham-fisted, DIY method to affix them to your tailpiece, usually involving brightly-colored foam, Velcro, and/or cable ties. Not only does this hinder the ability of your strings to transfer vibrations through your bridge to the top of your instrument (aka the fundamental concept of how string instruments work), it looks TERRIBLE on your $5,000+ bass.
No, preamps do not belong on your tailpiece, they go on your pedalboard or on your amp. Yes, they make 20’ TRS cables that are just as durable as a regular guitar cables.
The K&K is pretty much the only option on the market that you can set on top of your amp. The Shadow’s pickup elements connect directly to two separate 3mm TS inputs on the preamp. Blast Cult’s tailpiece pickups are, well, in the tailpiece (refer to the acoustic instrument fundamentals above). The Felix and Tonebone are large foot controllers. The Tonebone notably says Tonebone on it in large print, further rendering it useless to any player with a modicum of respect for their women colleagues and audience.
While you can set the K&K on top of your amp, it is not optimally designed for this. The bottom of the chassis has a belt clip screwed to the back of it. Yes, a belt clip. If you need to take a moment to review how poorly conceived this design is, I’ll wait here for you.
Setting the preamp on the belt clip side causes it to rattle around when you play your instrument. Bass frequencies tend to cause things to rattle around, especially on the surfaces from which they emanate.
Setting the preamp on the faceplate side eliminates this, but obscures the labels for the controls and the input and outputs. You’d think it would be easy enough to remember which knob does what, but it’s not. When the preamp is upside down, everything is reversed, which is not an easy thing to compensate for while you are in the middle of a song or a solo.
My solution for the past 15 years has been to tuck the cables under the handle of my amp, and snug the preamp as close to it as possible. This was fine, but still a bit irritating since the chassis always sat cockeyed on top of my amp—my custom Mesa amp that I paid extra to have covered in Vintage Bordeaux Bronco nogahide, tan grille cloth, and brown leather corners and handle because music is a really big deal to me and I care about the way the instruments I play every day look.
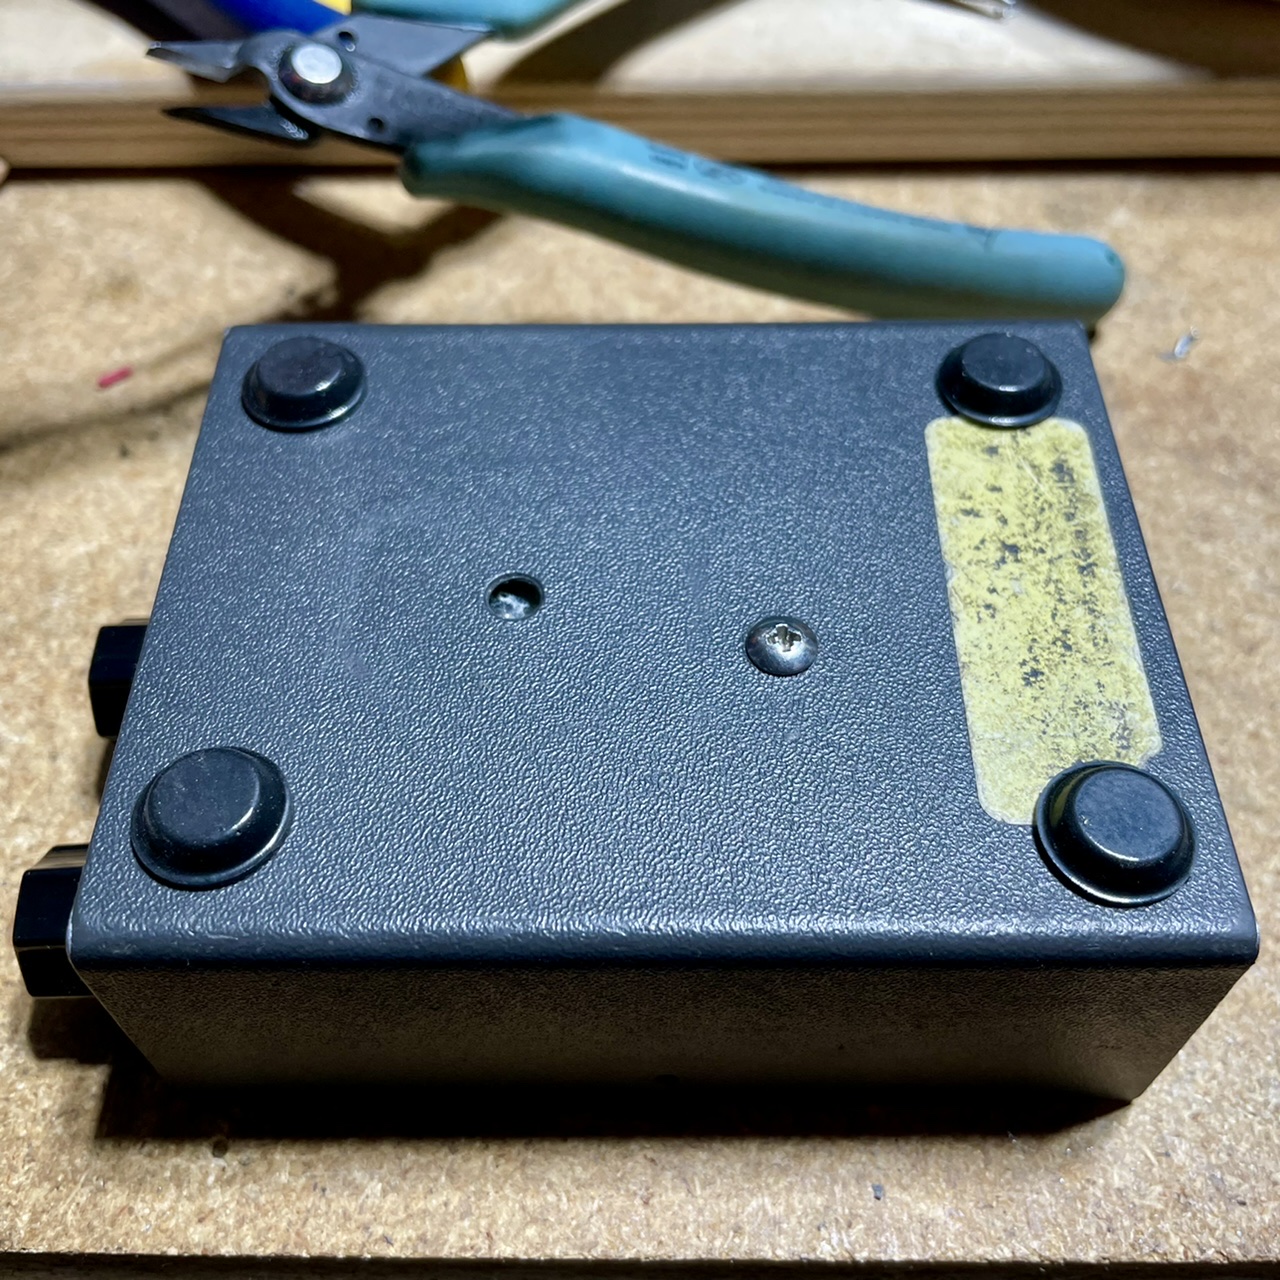
Cockeyed doesn’t fit my personal style, so the belt clip has to go! This is easier said than done. It requires pulling the circuitboard.
Since we have to pull the circuitboard, we might as well address the other design flaw elephant in the room: the battery.
Batteries have no place in your signal chain. They are a ticking time bomb, waiting to slowly wreck your sound before silencing you completely. They are expensive, especially when factoring in all those times you inevitably forget to unplug your cable. And they are bad for the environment. With the rise of the pedalboard era, there is no excuse to be using a piece of equipment that requires a disposable power source. The battery clip has to go!
Removing the Belt Clip
The belt clip is attached with a small screw that goes through the back of the chassis, through a square piece of steel, and then into a tiny nut. If you attempt to unscrew the clip without first removing the circuitboard to access the nut, the whole screw assembly will just spin.
First, remove the top panel with the sticker on it to expose the circuitboard inside. Grasp the nut at the end of the standoff between the two ¼" jacks. Your fingers should suffice. Use a #2 Phillips screwdriver to loosen the screw. There are small washers on each side of the sleeve and another below the circuitboard. Take care removing the assembly so as not loose any small pieces inside the chassis, as they can cause shorts. This standoff acts as the ground bus for the unit.
The chassis is made up of a U-shaped piece of bent steel, and two separate rectangular panels that are connected to the ¼" jacks on one side, and the pots on the other side. These jacks and pots are mounted directly to the circuitboard, meaning when you remove the circuitboard, you are taking the two rectangular panels with it.
Bend the sides of the U-shaped chassis slightly outwards to loosen the circuitboard assembly. It’s wedged tightly in there, so use care as you pull it out so you don’t break any solder joints. You may have to peel back the velcro square used to hold the internal screwdriver in place.
Below the circuitboard, you will find a piece of clear plastic insulation that protects the traces from shorting out on the chassis. If you are able, remove the standoff screw so you can remove the plastic insulation to expose the piece of duct tape hiding the nut of the belt clip screw. Yes, K&K used a piece of duct tape to assemble your $300 preamp.
I was unable to remove the nut holding the standoff screw, but the hole in the plastic insulation was large enough for me to pull over the nut.
Peel off the duct tape to expose the nut holding the belt clip in place. Use needle nose pliers and a #1 Phillips screw driver to remove the belt clip. You can use acetone and a razor blade, or goo-gone to remove the duct tape residue.
If you won’t be installing a power jack, you can now reassemble the unit in reverse order, taking care not to flex the panels connected to the inputs and pots. Also be sure to align the standoff/grounding screw correctly. It is not centered on the circuitboard.
Install A 5.5mm Power Jack

I replaced the 9 volt battery clip with a 5.5mm DC jack, wired positive sleeve.
Get yourself a 5.5mm external, 2.1mm internal power jack. On the side opposite the Velcro patch, measure and drill a small pilot hole for the power jack. I drilled mine slightly to the right of the hole that locks the lid in place. Take care to leave clearance for the lip of the lid that fits over the top of the chassis. Incrementally step up your drill bit size to enlarge the hole. A step bit is very useful for this.
You can drill the hole on the faceplate attached to the pots, but I would recommend removing it from the circuit board before doing this, to avoid breaking any solder joints.
File off any burs from the hole, and vacuum up any metal shavings. Don’t install the power jack yet. First reassemble the unit in reverse order, taking care not to flex the panels connected to the inputs and pots.
Once the standoff/grounding screw has been tightened and everything is back in place, you can install the power jack.
Clip the 9v DC leads right where they enter the battery snap. There should be plenty of slack to connect them to the power jack. Take note of the positive and negative terminals of the 9v power adapter you will be using. I recommend the Truetone 1 Spot adapter as it filters out noise better than off-the-shelf adaptors. Most guitar pedals have the positive DC on the sleeve of the cable and negative on the pin.
Strip and tin the wires, then solder the red to the positive terminal (the longer one usually connects to the sleeve), and the black to the negative.
Reassemble Everything
With the belt clip removed and rubber feet added, the preamp now sits securely atop my amp.
Once everything has been reassembled, use self-adhesive rubber feet to give clearance to the standoff assembly screw head on the bottom of the chassis. You now have a free-standing preamp that will resist vibrating, sliding, and wobbling. Better yet, Velcro the bottom and stick it to your pedalboard!
For added measure, replace those cheep stock knobs with something more durable. Mine actually broke years ago.
For improved usability, print out this new sticker below for your lid. The text faces the correct way, and there is less of it to read. For best results, use printable vinyl sticker paper, then spray with poluirethane (note: these are Amazon affilate links).